Introduction to webhooks
Table of contents
Introduction
A webhook is a way for Ongoing WMS to send an HTTP request to your server when some event occurs in Ongoing WMS. Using webhooks means that you don't have to poll Ongoing WMS for changes, which means that webhooks are more efficient than a traditional API integration.
As an example, you can set up a webhook which makes a call to https://yourserver.com/api/OngoingOrderPicked whenever an order is picked in Ongoing WMS. When an order is picked, the following happens:
- Order 12345 is picked in Ongoing WMS.
- Ongoing WMS triggers the webhook.
- An HTTP request is made to https://yourserver.com/api/OngoingOrderPicked, with a JSON payload indicating that order 12345 was picked.
- Your server can process this request and do what you like, such as sending an email to the end customer. If the webhook payload does not contain all the information that you want, make a request back to one of our APIs to fetch more information.
Retry policies
You can set a retry policy on each webhook. This determines how Ongoing WMS will react if the webhook fails. The following retry policies are available:
- None: Ongoing WMS will not retry a failed webhook trigger.
- One day (first retry after 1 minute) (Recommended): Ongoing WMS will retry the webhook after 1 minute, then 5 minutes, then 15 minutes, then 30 minutes, and then every 2 hours until 1 day has passed.
- One hour (first retry after 1 minute): Ongoing WMS will retry the webhook after 1 minute, then 5 minutes, then 15 minutes, then 30 minutes.
Regular webhooks and automation webhooks
A regular webhook will only fire for a specific goods owner.
An automation webhook will trigger for one or more goods owners.
For instance, if you create a regular webhook for whenever an order is picked, then it will only trigger whenever an order is picked for the goods owner which you selected.
An automation webhook for whenever an order is picked will trigger whenever an order is picked for any of the goods owners defined on the webhook.
Creating a regular webhook
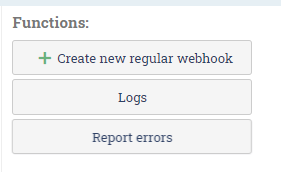
Go to Administration ⇒ Webhooks and click on Create new regular webhook and select a webhook from the list. Fill in the URL and an email address, and authentication details if applicable. Additional settings might be available depending on the type of webhook. Tick Enabled if you want to enable the webhook.
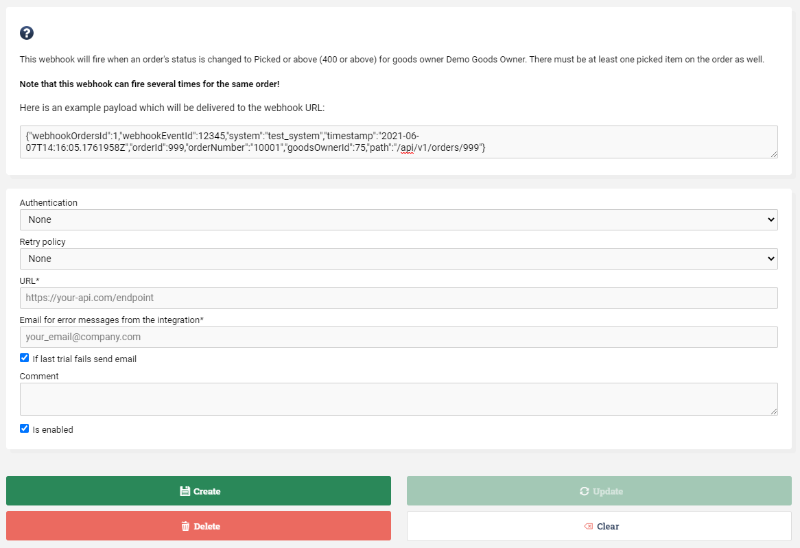
Webhook filters
For some types of webhooks you can apply filters. For instance, if you have a webhook which triggers when an order is picked, you can apply additional filters so that it only triggers if the order has a certain transporter or is of a certain order type.
Testing a webhook
If you wish to trigger a webhook manually, for testing purposes, go to Administration ⇒ Webhooks and find the webhook in the list. Click on Test.

Logs
Browse Administration ⇒ Webhooks. Press the button Logs.
Here you can see whether the webhook has been sent and whether it has succeeded. This is useful in your development to track down potential errors in the setup and the communication.
Authentication
To prevent third parties from sending spoofed webhook requests to your endpoint, it is advisable to turn on authentication for your webhooks. This allows you to authenticate that each webhook request comes from Ongoing WMS. You can configure the authentication settings for each webhook in Administration ⇒ Webhooks.
The following authentication methods are available.
None
No authentication at all is done.
Basic
When using basic access authentication, you enter a username and password on the webhook. When Ongoing WMS makes a request to your endpoint, the username and password are sent in the request, in a header called Authorization. Your endpoint can then authenticate the request by checking the username and password.
Ongoing WMS constructs the Authorization header using the following procedure:
- The username and password are combined with a single colon (:).
- The resulting string is encoded using Base64.
- The string Basic followed by a space is prepended to the Base64-encoded string.
- The result is sent in an HTTP header called Authorization.
In pseudocode, Ongoing WMS constructs the request like so:
    var request = new Request(payload, endpoint);
    var userNameAndPassword = Base64Encode(userName + ":" + passWord);
    var authenticationHeader = "Basic " + userNameAndPassword;
    request.headers.add("Authorization", authenticationHeader);
    request.MakeRequest();
Fixed X-Auth token
When using this type of authentication, you enter a token on the webhook. When Ongoing WMS makes a request to your endpoint, the token will be sent in the request in a header called X-Auth-Token. By checking the token, you can validate that the request is coming from Ongoing WMS.
In pseudocode, the request is constructed like so:
    var request = new Request(payload, endpoint);
    request.headers.add("X-Auth-Token", token);
    request.MakeRequest();
Mutual TLS (mTLS)
When using mTLS, you upload a certificate on the webhook and this certificate is attached to each webhook request that Ongoing WMS makes. The webhook receiver can then inspect the certificate and validate it.
Additional headers
When setting up the webhook, you can specify additional headers. Whenever Ongoing WMS triggers the webhook, it will include these additional headers in the request. As an example, say that you want each webhook request to include a header called "X-Company-Id" with the value 654, then you simply specify it like so:
X-Company-Id: 654